Salted caramels
Chewy, slightly soft, very buttery, nicely salty. What more do you want?
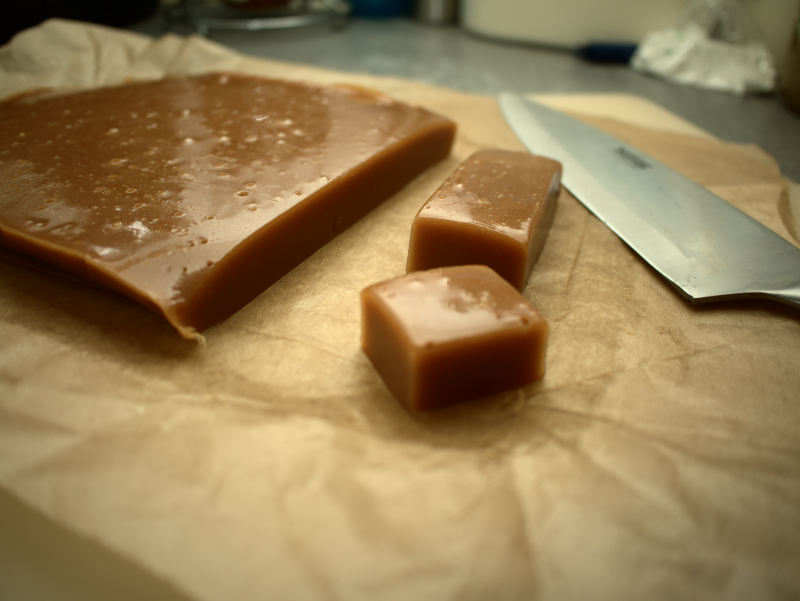
This recipe scales up pretty well, I had started out with a larger recipe but decided the 170 mL carton of cream is the most common carton. If you want to scale it down, you'd need to find specialist pots though.
Sausage pasta bake
Leftover tomato sauce from pizza has to get turned into something tasty. It's even better if it can be turned into something delicious with low effort for the next day's dinner. Pasta bakes can be prepped ahead of time and thrown in the oven whenever, making life pretty easy. Soaking the pasta in hot water instead of going to the trouble of boiling a pot of water makes things easier again. Cover it in cheese, and sure put more cheese on it when it's served up.
As the pasta will be baked in the oven (and possibly sitting in sauce for 24 hours), it doesn't need to be fully cooked before assembling the dish. By soaking the pasta in water before cooking, it has time to fully hydrate, the final stage of cooking can then happen in the oven. Using hot water shortens the hydration time, but cold water works just as well, but takes longer (I use this method for lasagne as I like to do a long low simmer on the ragú). The starches all swell up with the water, and don't take anywhere as long to cook as usual. Don't forget to salt the water as usual, and to save dishes, I soak the pasta in the dish it'll be baked in. Respect to Ideas in Food for the idea, and their book of the same name that's light enough to read in bed. I've been soaking lasange sheets since I read it. The other advantage is that your pasta probably won't soak up as much sauce as usual, so you'll still have an actual sauce in your pasta bake.
Slow-cooked shredded chicken
Slow cookers are great for ignoring; put things in, turn on, ignore, eat. You can ignore them completely if you get one with a timer, or get a timer plug. The things made in slow cookers aren't delicate, but they can end up juicy and tender. They usually travel well to potlucks, where you can wow people by telling them "oh yes, this took 8 hours to make" (although it took only 10mins of hands on work).
Shredded chicken takes 8 hours on low. During this time, all the connective tissue between the muscle fibres breaks down and melts away. You're left with juicy shreds of muscle for very little work. The seasoning can be changed to suit. To minimise the work in this, I pick up a packet of taco seasoning. The full packet can be a little salty in the small volume, but you can add less or make your own.
The shredded chicken is great with bowls of rice and some grated cheese, but you can also just serve it up as a tasty dip for crunchy tortilla chips. If making a mess is your thing, then load it into burritos. It freezes well, and seems to keep its flavour for a long time. I've eaten this from the forgotten depths of the back of the freezer months later, and it's been grand (though you're best off eating it w/i a month before freezer burn or general degradation kicks in).
Hello new postgrad researchers
The other week, I was asked to give a five minute overview of my experience as a postgrad and any advice I thought might be useful to incoming postgrad researchers. I discovered that five minutes is not enough, and that other's don't seem to think I'm as cynical as I am (or it just didn't come across clearly).
In essence, I want to tell new postgrads that not everything will be rosy all the time, but that people are there to help (although they may not be the people you want to help). I think the main point I had was to look after your mental health.
Research can be a bit isolating, whether you're locked in a lab on your own or surrounded by other researchers, you'll usually be working on /your/ project with /your/ problems and research questions. Sometimes people will offer help. Sometimes people will be too busy to notice you and you'll have to ask for help (it's usually nothing personal, they're as engrossed in their own work/problems as you are). Learn to ask for help. You're new in the door (or even around for a while), you're not expected to know it all, you're expected to learn. Do ask for help, you'll often find out that others have encountered the same problems you have before and might know a solution (or at least be able to tell you which avenues not to bother with).
Pizza, bread, dough
About five years ago I started making yeast breads and asked my beloved for a pizza stone for my birthday. Thus began the great pizza-making adventure. A good yeast bread isn't too hard to make, though making great yeast bread took a bit more experimenting. Same with the pizza, a good pizza is easy to make, great pizza takes a bit more thinking, but even failed attempts are delicious.
For yeast breads, I found that I am very happy working with stupidly wet doughs. Though it took a couple of years to get there, it's worth every ten-minutes-scraping-your-hands-under-the-tap-trying-to-get-the-sticky-dough-off until you realise that you don't even need to knead this bread all that much. You end up adding a bit more flour when you roll out the pizza bases but the matching loaf made with the leftover dough is wonderfully fluffy with a chewy crust.
Last year I picked up a tub of horlicks intending to make @wholesomeIE's malted milk biscuits (which I still haven't made...) and wondered if there were any other recipes I could use it in. Horlicks is a mix of malt and milk powder, so I wondered if you could use it as a dough improver. A lot of the loaves of yeast bread I made, I used half milk/half water as it gave a softer inside and the bread lasted a two to three days without turning into a rock. It turns out horlicks is a brilliant dough improver. The horlicks bread keeps as well as the milk breads and gets a browner crust thanks to the malt. The pizza crust turns out better than a milk bread pizza crust too. Since I discovered horlicks as a dough improver, I haven't made a batch without it and have gone through two tubs of horlicks (it's also nice added to hot chocolate, but made up on its own with milk it's gross).
As well as owning a pizza stone, I can highly recommend owning dough scrapers. They're pretty handy for scraping wet dough off surfaces, folding over wet dough, and scraping all the flour up when you're finished. You can use them to cut dough as well, or move lumps of dough about. After five years of making bread without them, and a few months making bread with them, I would say don't wait as long as I did to get a pair (one is good, two are better).